Facebook Timeline officially rolled out in March and in true Facebook fashion, there are have been plenty of updates to pages since then. With the new layout and so many new changes, it’s hard to keep track of it all. While most businesses have settled in to the basic features of Facebook Timeline for fan pages, there are several features that few know about and yet could prove to be extremely helpful.
1. Request to change your Facebook page name. It used to be that Facebook only let pages under 100 fans change their page names and pages over that mark were stuck with their name. With the rollout of Timeline, Facebook makes it possible for all fan pages to change their names. The only catch is that if the page is over 100 fans, you have to submit a request to change the page name. Keep in mind that Facebook only allows for one name change so if you’re thinking of changing the name, choose wisely.
To change your page’s name under 100 fans, simply edit name under the “basic information” tab in the admin settings panel. If your page is over 100 fans, go to the same section. Instead of being able to just type in the new name, Facebook will direct you to a link to request a name change.
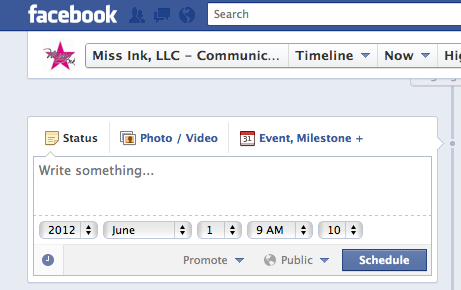
2. Schedule your Facebook page posts. Facebook recently introduced this long-awaited feature. Instead of using third-party apps, users can now schedule posts directly from their Facebook page. To do this, click on the status box. In the bottom left-hand corner, you will see a symbol that looks like a clock. Click on that and follow the prompts to schedule your post.
3. Customize tab images. One of the main goals of the new Timeline layout is to make pages visually appealing. Thus, the addition of cover images. What you may not know is you can also customize your tab images. For instance, if you’re running a contest, you can make a tab image promoting the contest so that when users visit your page, it catches their eye and entices them to click on it. Tab images can be changed by clicking on the pencil icon in the top right-hand corner of the tab box. Click on edit settings and you will be able to add the image here. (Diazepam) Quick tip: The tab image size is 111 x 74 pixels.
4. Manage admin roles. Want to select different access levels for each of your admins? Now you can! In the admin panel, you will see that the admin tabe is now named “admin roles.” Every time you give admin access to someone you can choose from manager (full admin access), content creator (can create new posts), moderator (can respond to posts), advertiser (can create ads and insights), and insights analyst (can view insights only).
5. Highlight and Pin stories. This is a terrific feature if there is a post that you want to stand out. Maybe it’s a post that is popular with your fans or it’s a major company announcement, either way you can now choose to give it additional visibility. Both can be done right in the post box. When you click on the star, that highlights the story, which means that it will expand wherever it lands on the timeline. In the edit box (click on the pen icon next to the star) you can choose to pin the story to the top. This means that the story will now appear “pinned” at the top of your page.
Want to learn more Facebook tips and tricks? Check out Miss Ink’s Social Media Training Workshops.


URL
… [Trackback]…
[…] Read More here: miss-ink.com/5-little-known-facebook-fan-page-features/ […]…